Monday, 20 July 2020

Instagram: Tips and Tricks to Master the Social Network


Instagram: Tips and Tricks to Master the Social Network
You can hide your online status as well as your read receipts on Instagram
HIGHLIGHTS
  • There’s a way to zoom into Instagram profile pictures

  • Instagram is owned by Facebook
  • You can schedule posts on Instagram

JUMP TO


Instagram is one of the world's most popular social networks. There is a lot more to it than just posting photos and videos. You can use it to edit photos and save them without posting, decorating your profile with special fonts, scheduling photos and videos, and much more. In this list of Instagram tricks, we will show you everything you need to master the social network.

Best Instagram tips and tricks

1. Save a High-Res Photo Without Posting

Follow these steps to save high-resolution photos edited from Instagram without posting them.
  • Open Instagram > tap your profile > tap the hamburger icon > go to Settings.
  • Now, tap Account > tap Original photos > turn on Save Original Photos.
  • Similarly, if you're using an Android, tap Account > tap Original Posts > turn on Save Original Posts.
  • From now on, whatever you post will be saved locally on your device. However, the plan is to save edited high-res photos without posting them online and this is how you can do it.
  • After enabling the suggested setting, put your phone on Airplane Mode.
  • Now open Instagram > hit + > add any photo. Go ahead and edit it. Keep going and once you are on the last page, skip adding the caption or location and simply post the picture.
  • So, because Airplane mode is turned on, Instagram won't be able to post the picture, but in return, you will have yourself the same edited photo in your phone's gallery.
  • Now, before turning off Airplane mode, make sure that you have deleted the picture on Instagram that wasn't posted. This is because if you don't delete it and turn off Airplane mode, the picture will automatically be posted once your device is connected to the internet.

2. Schedule Instagram Posts

Have you ever wondered how you can make your followers think that you're travelling even during the lockdown? One way is to keep posting one travel picture every day. So, how do you do that? Simply follow these steps.
  • The first method to schedule posts requires you to have a business account. To turn your account into a business account, open Instagram and tap your profile icon. Now, tap the hamburger icon in the top-right and go to Settings. After that go to Account and at the bottom you'll see an option that lets you create a business account, select it and follow the prompts to transform your account into a business account.
  • Note that switching to a business account means your profile will be public because business accounts can't be private. If that's a problem, I'd suggest you skip to the next tip.
  • Moving on, visit facebook.com/creatorstudio on your computer. The process can be done on a phone as well, however, the experience is not that smooth on smartphones.
  • Now, once this site is loaded, click the Instagram logo up top and connect your Instagram account with this page in order to go ahead.
  • You now have to click Create Post and click Instagram feed. Now, simply add the photo that you'd like to schedule. Add its caption, its location and once you're done doing all this, click the down arrow right next to Publish, and select Schedule. Now, enter the time and date, and once you're done, hit Schedule. Doing this will schedule your post for the future.
  • This is an official method and for now it only works for business accounts. However, if you have a normal account and you want to schedule posts on Instagram, in that case you can do it via a third-party app.
  • Download the Preview app on your iPhone. To download on Android, click here.
  • Follow the on-screen prompts and set it up.
  • So, once your Instagram account is linked, from the homepage, click + and select Photos/Videos. After that choose the photo or video that you'd want to schedule.
  • Once that photo is loaded on the main page, you tap it. After that, there's an option to edit the photo as well if you want to. Once done, hit the thought bubble.
  • On this page, you can add captions and hashtags, but most importantly, you need to tap Schedule Post. Once you do that, you'll be asked to choose the date and time. Finally, hit Done.
  • Your post will now be scheduled for the future. You will be able to check and manage your scheduled posts by hitting the calendar icon up top. Also, if you wish to delete the scheduled post, then that's possible as well.

3. Zoom In to Instagram Profile Pictures

To access a full-size Instagram Profile picture, follow these steps.
  • Visit instadp.com and enter the account username of the person whose profile photo you want to view in full size.
  • Once you've found the profile you were looking for and it is loaded, simply hit Full Size and scroll down. You can then either screenshot it to make a meme or do whatever you wanna do. That is literally it. You're welcome.

4. Post Without Giving Access to Camera, Photos or Mic

Did you know that with instagram you can post photos, videos and even stories, without even having to give permission to the app. How is it done exactly? Well, you can do it from Instagram's mobile website. Follow these steps.
  • Open Instagram in your phone's browser.
  • Now, to upload a photo, tap + at the bottom > tap Photo Library or you can click a new photo > choose your photo, edit it as you would usually do > tap Next, write a caption, add your location and tag people. Once done, hit Share.
  • Similarly, if you want to post an IG story, from the home screen tap the camera icon up top > choose a photo or click a new one > edit it and once you're done, tap Add to your story to go ahead.
  • Next, to post a video in your story using an Android phone, open the video that you want to share in the Gallery. Tap the Share icon > tap Instagram Stories. There is no way to share videos to an Instagram story via an iPhone.
  • Lastly, to post a video to your Instagram feed using an Android phone, open the video > tap Share > tap Instagram Feed. From here on, edit your video > tap Next, add a caption > tap Share and that's it.
  • Similarly, if you have an iPhone, go to Photos and choose the video that you'd want to share in your Instagram feed. Open the Share Sheet and select Instagram. iPhone users only get the option to add a caption. Once done, hit OK to share the post.

5. Hide Your Online Status and Read Receipts

You must have noticed a green-dot icon that appears right next to the profile icon in DMs. This icon shows up whenever a user is online on Instagram. However, there's a feature that lets you hide your online status on Instagram. Follow these steps.
  • Open Instagram and go to Settings. Tap Privacy > tap Activity Status > turn off Show Activity Status.
  • This way no one will be able to know whether you're online on Instagram. On the downside, you also won't be able to see the activity status of your friends.
  • There's also a neat trick to hide read receipts. Whenever you receive a new message on Instagram, instead of opening the chat thread, turn on airplane mode on your phone. After airplane mode is on, go back to the chat thread and read the message. This way you'll be able to read the message without notifying the sender that you've seen their text.
  • Now, before turning off airplane mode, make sure you log out from Instagram. To do that, tap your profile icon > tap the hamburger icon > go to Settings. Scroll down and select log out.
  • After logging out, you can turn off Airplane mode, and with your phone now connected to the Internet, you can now log in to your Instagram account.
  • Now, when you'll go back to Direct, you'll see an unread badge right next to the sender whose message you just read a few moments ago. You can basically ignore this now, as you have already read the message contents.

6. Enable/ Disable Comments on Posts

Yes, you can disable comments on any of your Instagram posts. To know how to do it, follow these steps.
  • Open any of your Instagram posts and tap the three-dots icon in the top-right and tap Turn Off Commenting.
  • To turn off commenting even before you have shared a post, on the final page where you add caption and location, tap Advanced Settings. On the next page, enable Turn Off Commenting.
  • To enable commenting, choose your post, tap the three-dots icon in the top right and tap Turn on Commenting.

7. Make a Photo Collage in Your Instagram Story

To learn how to make a photo collage in Instagram stories without using any third-party app, follow these steps.
  • If you're using an iPhone, open Instagram and tap the Camera icon. Now, choose a photo that you'd want to post. Once this photo is loaded, minimise Instagram and go to the Photos app. Now open the second photo, hit the share icon and tap Copy photo.
  • Now go back to Instagram and you will see a pop-up on the bottom-left asking you to add this photo as a sticker. Tap it and that's all. Now resize and arrange it as you like. You can repeat this step as many times as you like to make your collage. Once done, share your story.
  • On the Android side of things, the process is a little longer, but it is possible. Here's how.
  • Download the Swiftkey keyboard from Google Play. Once the app is installed, give it all the permissions and set it up. After that, exit Swiftkey.
  • Now, go to Instagram Stories, and create a background for your collage. I will go for a black background.
  • Once done, tap in the middle so that the keyboard shows up. You then click the sticker icon from the top row of the keyboard, followed by clicking on the Pin icon in the bottom. Once you do that, you need to click the camera icon, then give permission to the app and that's all.
  • By doing this, you can now choose any photo as personalised stickers. Once you tap the photo, it appears on the screen, after which you can freely resize it or arrange it. You can repeat the steps and add as many photos as you'd like.

8. Decorate Your Feed With a Grid of Photos

To decorate your Instagram feed with a grid of photos you'll need a third-party app that can split your image into 9 parts. Follow these steps.
  • On Android, download Grid Maker For Instagram from Google Play. Once installed, open the app and choose the photo that you want to split into 9 parts.
  • Once the photo is selected, make sure 3x3 is selected. Now when you go ahead, you'll see your photo split and numbered into 9 parts. Simply tap in increasing order and keep posting on your IG feed.
  • Similarly, if you have an iPhone, you can download the app Grid Post - Grids Photo Crop, to split your photo into 9 parts.
  • Once the app is installed, fire it up, select 3x3 up top, and tap Photo Grids. Now tap Select Photos > choose your photo > tap Next. You have to keep on going until you see the edit screen. You can choose to edit the photo if you want or you can simply go ahead by tapping Done.
  • Now, similar to Android, simply tap on the photos in ascending order and post them all to your IG feed.

9. Turn On Two-Factor Authentication

Two-factor authentication lets you add an extra level of security to your account. With 2FA on, you'll always require an additional code whenever you login from an unfamiliar device. To turn in on, follow these steps.
  • Open Instagram on your phone and go to Settings. Tap Security > tap Two-Factor Authentication > tap Get Started.
  • On the next page, you can choose your security method. We will recommend choosing the Authentication app method. For this, you'll need to download any authenticator app such as Google Authenticator or Authy and set it up.
  • Now, go back to Instagram. From the Choose your security method page, enable Authentication app. On the next screen, tap Next. Doing this, you'll be redirected to the Google Authenticator app. Tap Okay to save the key for your account > tap Add Account.
  • Copy the code on screen and paste it on Instagram. Hit Next and tap Done.
  • Finally, on the next page, you'll get some recovery codes. Read the instructions carefully on-screen and store them safely. That's it.
  • So, with 2FA turned on, whenever you login from an unfamiliar device, you will always be asked to enter a code after entering your password, basically adding an extra level of security to Instagram.

10. Customise Your Bio with Special Fonts

Instagram has millions of users, but how do you stand out? One way is to use special fonts. Now, not only can you post visually appealing photos on Instagram, but you can also customise your personal details in a way that they look attractive to your profile visitors. Here's how to do it.
  • Go to your IG profile on a computer. We'd say computer because it just makes the process easier. You can also do this on a phone.
  • So, once you've opened your IG profile, hit Edit Profile and copy your name.
  • After this, open a new tab and visit igfonts.io.
  • Over here, paste the text that you just copied. By doing this, you'll now see the text in a variety of different fonts. Choose any > select and copy > go back to your Instagram profile and paste it.
  • Similarly, you can repeat the process for your bio as well.

11. Disappearing Texts

Instagram lets you send a disappearing photo or video to other users. To know how to do this, follow these steps.
  • Open Instagram > go to Direct > select a chat thread.
  • Tap the camera icon for sending a photo or video > tap the gallery icon in the bottom to open the saved photos in the gallery > select any photo, and once you do that you will see at the bottom that there are three options.
  • View once means the receiver will only be able to see this photo or video once. Allow Replay will let them play the photo for one more time. Lastly, Keep in Chat is the regular method of sending a photo that most of us usually follow.
  • So, once you hit View once, your photo will be sent to the receiver and they will only be able to see the post only once after they have opened it.

12. Make a Collection of Posts

Instagram is all about photos and videos, so why not save the photos and videos that we come across on Instagram and create a collection of sorts. For instance, you like a lot of photos of new cars on Instagram, so why not make a designated folder for it? Simply follow these steps.
  • Go to Instagram and tap the profile icon. Now, tap the hamburger icon at the top and select Saved.
  • Over here, make a list. For example, let's name it Phones.
  • Now, whenever you come across a good photo of any phone on Instagram, you can simply tap the Save icon. Doing that, you'll see a pop-up that says, Save to Collection. Doing that you can choose to save the phone photo in the Phones list that you created earlier.
  • Similarly, you can make as many lists as you want and start saving photos and ultimately making a collection of photos on Instagram.

BONUS — Why Block When You Can Restrict?

If someone's annoying you on Instagram and you don't want to block them outright, you can easily restrict them. To do that, follow these steps.
  • Open Instagram and go to the user profile of the person you want to restrict.
  • Next, tap Following > tap Restrict > tap Restrict Account.
  • Now, whenever this person interacts with your posts in the future, for instance, they comment on your photo; in that case, their comment will only be visible to them. Their chat will be moved to your message requests. Moreover, you'll be able to control if you want to read comments made by them or ignore them. The best part is, the person won't even get to know that you have restricted their account.
These were some of the best tips and tricks to master Instagram.
For more tutorials, visit our How Tosection.

Spotify Now Available on Alexa-Enabled Devices in India, Starting With Amazon Echo

Spotify’s Alexa support is currently limited to only Amazon Echo devices, but will extend to more Alexa-enabled devices in the future.
Spotify Now Available on Alexa-Enabled Devices in India, Starting With Amazon Echo
Spotify made the announcement about Alexa support in a statement on Friday
HIGHLIGHTS
  • Spotify will initially be available on Echo devices only
  • Soon, it will release support for other Alexa-enabled devices
  • Spotify recently signed a deal for original DC podcasts
Spotify on Friday announced that both its Premium and free tier subscribers can now use the music streaming service with Alexa on Amazon Echo devices in India. The Swedish company also detailed several Alexa voice commands that its users can utilise, from playing playlists to podcasts. While for now Alexa support is limited to Amazon Echo devices, Spotify says it will soon be available on other Alexa-enabled devices, including Fire TV models and mobile devices.
To set up Spotify on Amazon Alexa, users will need to go to their Alexa app, and visit Settings > Music > Link New Service and then select Spotify. Users will then have to key in their Spotify username and password. If users would like to make Spotify their default music service on the Amazon Echo device, they can also enable Default Services.
Once the user has linked their Spotify account with Alexa, they can use the Spotify app to play content on their Alexa devices by saying “Alexa, Spotify connect”, thereby making the Alexa device discoverable in the music streaming app. Alternatively, users can look for Devices Available on the now playing screen of the Spotify app, and then select the Echo device they want to listen on.
Spotify had originally added support for Amazon Echo devices back in 2016, but only for premium subscribers and in select markets. The streaming service's free tier users also got access to Alexa-enabled devices in November 2019, but the same was restricted to select markets. Spotify is also already available on Fire TV Stick dongles.

Earlier this month, Spotify signed a deal with Warner Bros. and DC Entertainment to bring an original slate of narrative scripted podcasts to the streaming service. At the time, the Swedish company – which competes with Apple Music – said that 19 percent of its total monthly active users listen to podcasts, and that it has over 1 million podcasts on its platform.
As mentioned, Spotify detailed a bunch of voice commands users can utilise to control the music streaming service on an Amazon Echo device. These are:
Playlists
  • “Alexa, play my Daily Mix 1 on Spotify”
  • “Alexa, play Bollywood Acoustic on Spotify”
  • “Alexa, play Chai & Classics on Spotify”
  • “Alexa, play my <name> playlist from Spotify”
Movies
  • “Alexa, play Street Dancer 3D songs on Spotify”
  • “Alexa, play Kabir Singh songs on Spotify”
Songs
  • “Alexa, play Malang on Spotify”
  • “Alexa, play Dance Monkey on Spotify”
Artists
  • “Alexa, play Badshah songs on Spotify”
Artist Radio
  • “Alexa, play A R Rahman Radio on Spotify”
Genres
  • “Alexa, play chill tracks on Spotify”
Music Alarm
  • “Alexa, set alarm for 6 AM with meditation music on Spotify”
Spotify Connect
  • “Alexa, Spotify Connect on Kitchen Echo”
Podcasts
  • “Alexa, Spotify connect” and then select the Podcast on the Spotify app. It will play on the connected Echo device.

Skype introduces New Features

Skype for Windows, Mac, Linux Now Offers Predefined Backgrounds, Grid View for Up to 12 Participants

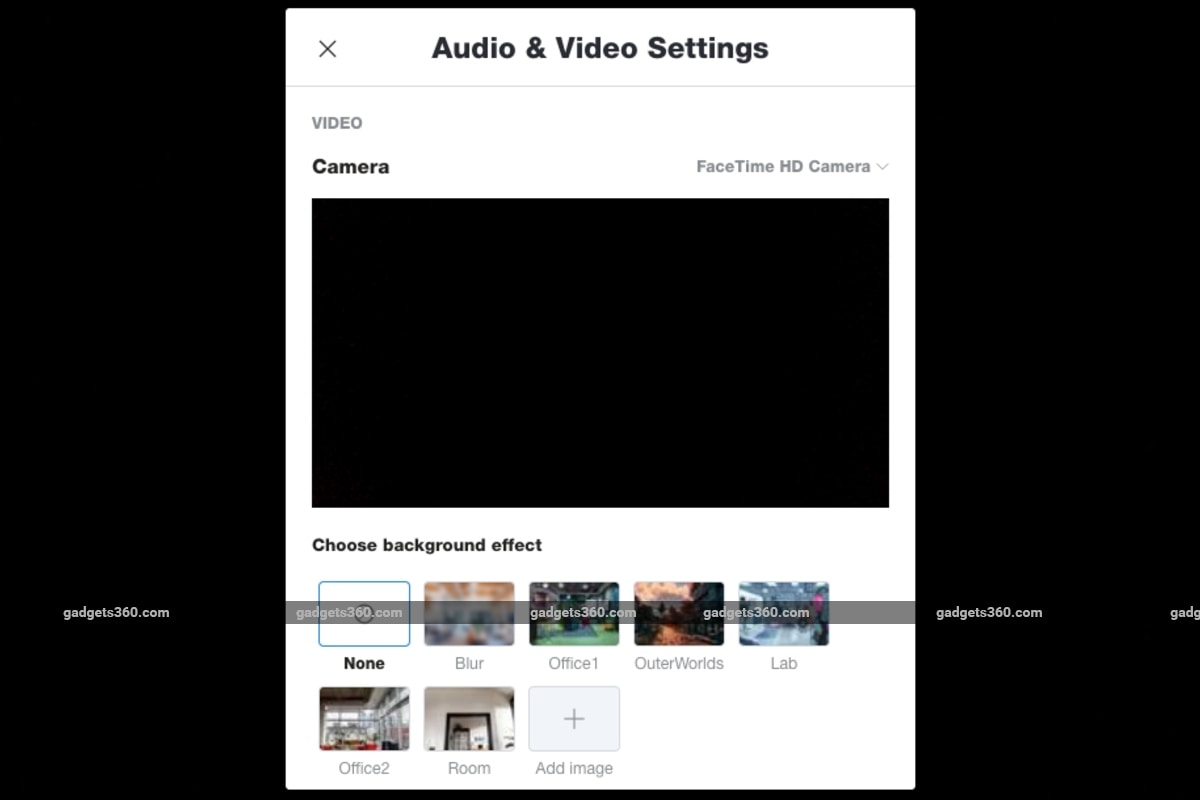
Skype version 8.62 for Windows, Mac, and Linux is out with six distinct, predefined backgrounds for video calls.

Skype for Windows, Mac, Linux Now Offers Predefined Backgrounds, Grid View for Up to 12 Participants
Skype already provided the option to add a custom background in video calls to mimic Zoom
HIGHLIGHTS
  • Skype provides predefined backgrounds such as Office1 and OuterWorlds
  • The updated app also has a grid view option
  • Skype for iPhone has received the ability to blur the background
Skype for Windows, Mac, and Linux has been updated with predefined backgrounds that you can choose for your next video call. The new update also brings a grid view to let you see up to 12 of your video call participants on a single screen. These changes from Microsoft are playing catch-up to Zoom, which already offers predefined backgrounds, and a grid view layout, which it calls Gallery View that supports up to 49 participants. The updated Skype app also includes various bug fixes and stability improvements.
The Skype version 8.62 for WindowsMac, and Linux is out with six distinct, predefined backgrounds for video calls. These new backgrounds are namely Blur, Office1, OuterWorlds, Lab, Office2, and Room. The predefined backgrounds are available alongside the option to let you add any of your custom backgrounds. That change arrived through the Skype version 8.59 in April.
skype predefined background update gadgets 360 Skype
Skype users on Windows, Mac, or Linux machines can now select a predefined background

In addition to the predefined backgrounds, the updated Skype app has brought the grid view that displays up to 12 participants in a video call. The experience seems similar to the Gallery View available on Zoom.
The latest update also improves message sync and comes with some general improvements, as highlighted in the changelog.
You can download the latest Skype version on your Windows, Mac, or Linux machine directly from the official site. Alternatively, you can get the update directly from your existing Skype app.
New features for mobile users
Alongside the updated experience for desktop users, Skype for Android and iOS has also been updated to version 8.62. The update brings the ability to see up to eight members of your video call directly on your smartphone or up to nine on your tablet. Further, iPhone users have received the ability to blur their camera background.
skype iphone background blur Skype
Skype for iPhone gets the background blur option

You can also expect some bug fixes and performance improvements. Moreover, you can update the Skype app on your Android device through Google Play or on your iPhone or iPad from the Apple App Store.

Mac Book Air 2020

Apple's MacBook Air needs no introduction. It's long been the go-to laptop for professionals and students, and in 2018, it got even better when Apple finally overhauled the design. However, the shallow keyboard that Apple introduced with that revision has been criticised quite heavily. Today, we'll be reviewing the latest 2020 model of the MacBook Air, which promises an improved keyboard based on customer feedback.
The new MacBook Air (2020) boasts of three major changes compared to its predecessor — a new Magic Keyboard, 10th Gen Intel processors, and 256GB of storage for the base variant (up from 128GB). In a very non-Apple move, the official starting price of the laptop is also now roughly Rs. 7,000 lower, at Rs. 92,990. I've been using the base version of the MaBook Air (2020) as my primary laptop for a few days, and it's time to see how much of a difference these changes have made.

MacBook Air (2020) design: Almost perfect

The MacBook Air (2020) continues with the same design of the 2018 refresh, but is just slightly thicker and heavier. If you're used to the older non-Retina MacBook Air, like I am, then there's a lot that's new. The overall size of the laptop is smaller, making it a lot more portable, and it's a bit lighter too, starting at 1.29kg. The entire body is built using 6000-series aluminium, which makes it feel very sturdy. The Apple logo on the lid isn't backlit anymore, but instead features a mirror finish, which complements the matte finish on the rest of the body.
macbook air 2020 review front MacBook
The MacBook Air (2020) features a Retina display and supports the latest Intel CPUs

The “gold” MacBook Air (2020) that I have more closely resembles rose gold, and looks a lot better than the rose gold finish of some older iPhone models. If you want to make a statement every time you visit a Starbucks, then I can see the appeal of the gold option. I'd still pick the silver or space grey colours over this, but that's just a personal choice.
The 13.3-inch IPS Retina display looks great and is a big step up from the non-Retina model, with a much higher resolution of 2560x1600 pixels. You also get Apple's True Tone technology, which automatically adapts the colour temperature of the display to ambient light. The bezels around the display are slimmer too, which makes the laptop look more modern. One thing that I found a little odd was that the upper corners of the display aren't rounded, but the ones at the bottom are. While the aluminium lid offers plenty of protection, the display still flexes easily when you touch it with a bit of pressure.
One of the biggest changes to the new MacBook Air (2020), is the Magic Keyboard. Apple has finally retired its problematic butterfly mechanism in favour of a new scissor mechanism. We first saw it on the 16-inch MacBook Pro last year.
macbook air 2020 review speaker macboom
The MacBook Air (2020)'s new Magic Keyboard feels responsive and comfortable to type on

The new keys feel very responsive thanks to the 1mm of travel and aren't noisy when you type. The key layout is very familiar, except for the power button, which is smaller compared to the non-Retina model. It also houses Apple's Touch ID fingerprint sensor. The latter works well with just a tap and is useful for logging in to the system, authorising app downloads, and when you need to autofill credentials for websites in Safari.
The MacBook Air (2020) has stereo speakers, one on each side of the keyboard. Apple says it can deliver twice the bass and up to 20 percent higher volume compared to the non-Retina model. There are a total of three microphones placed around the laptop, and thanks to the dedicated T2 security chip, you can use the ‘Hey Siri' voice command to summon Siri at will. The trackpad is 20 percent larger compared to the non-Retina model and feels just as responsive as before. Despite the increase in size, I didn't face any accidental presses or cursor movements while typing.
The trackpad also supports Force Touch, which means you get haptic feedback when you press down on any part of it. There's also a Force Click gesture that you perform by continuing to apply pressure after the click registers. You feel a stronger haptic pulse to know you've performed the action. I found it to be quite handy for previewing images and documents.
macbook air 2020 review thickness MacBook
The MacBook Air (2020) has fewer ports (right), compared to the 2017 MacBook Air (left)

The physical connectors on the MacBook Air (2020) have been reduced to just two Thunderbolt 3 Type-C ports and a headphone jack. The 2020 refresh now supports one 6K or up to two 4K external displays through the Type-C ports. The problem with having just Type-C ports is that connecting most common accessories to the laptop is next to impossible without an adapter. Ideally, you'll want to invest in a Type-C hub which has connectors for USB Type-A ports, Ethernet, and maybe an SD card reader. If you're already in the Apple ecosystem, transferring anything between Apple devices is at least less of a problem, thanks to AirDrop.

MacBook Air (2020) specifications and software: Up to date

Another big change with the 2020 refresh is the processor. The MacBook Air (2020) now features Intel's 10th generation CPUs, which promise better processing capabilities than the previous Retina MacBook Air. I'm testing the base model, which has an Intel Core i3-1000NG4 ‘Ice Lake' CPU, with two cores and four threads. It's built on the 10nm fabrication process and features Intel's Iris Plus integrated graphics. The base version of the laptop also has 8GB of LPDDR4X RAM and a 256GB PCIe SSD.
Apple India sells another pre-built model with a quad-core Intel Core i5 CPU, 8GB of RAM, and a 512GB SSD for Rs. 1,22,990. In addition, since May this year, you can customise Mac configurations through Apple Authorised Resellers in India. With this flexibility, you can opt for a quad-core Core i7 CPU, up to 16GB of RAM, and up to 2TB of SSD storage. The MacBook Air (2020) also features dual-band Wi-Fi ac, Bluetooth 5, an HD webcam, and a 50Wh battery with a claimed 11-hour battery life.
My only complaint is that 720p is a fairly low resolution for a webcam in 2020, and the footage it captures is generally a bit grainy, even in well-lit environments.
The MacBook Air (2020) ships with macOS 10 Catalina, and will get a free upgrade to macOS 11 Big Sur when it releases in a coupe of months. The MacBook Air (2020) also supports the Sidecar feature of macOS, which lets you use a compatible iPad as a second display, wirelessly. You can read about all the main features of Catalina right here. The latest 10.15.5 update also added a new battery health management feature for MacBooks to help maximise the lifespan of your battery.
macbook air 2020 review screen apple
The MacBook Air (2020) runs macOS 10 Catalina out of the box

MacBook Air (2020) performance and battery life: Good enough

If you're coming from a non-Retina Core i5 MacBook Air like I am, then switching to a Core i3 CPU might seem like a downgrade, but it actually isn't. Intel's current 10th-generation ‘Ice Lake' Core i3 processor in the MacBook Air (2020) is just as powerful, if not better in some ways than the fifth-generation ‘Broadwell' Core i5 in the non-Retina model.
In the Cinebench R20 benchmark, the MacBook Air (2020) posted a very similar multi-core score of 626 points as the older MacBook Air, but the single-core score improved by roughly 24 percent, at 348 points. The MackBook Air (2020) posted 16.3fps in GFXBench Metal's Aztec Ruins test, while my older MacBook Air managed 30fps. However, if we take resolution out of the equation, the Iris Plus graphics chip marches ahead. In the resolution-independent ‘offscreen' version of the same test, the MacBook Air (2020) managed 29.2fps, while the non-Retina MacBook Air managed just 20fps. While the integrated GPU in the MacBook Air (2020) is better, it still struggles with graphically intensive tasks due to the higher-resolution display.
SSD performance has also been improved. In the AmorphousDiskMark benchmark, the MacBook Air (2020) averaged 1.63GBps and 1.15GBps in the read and write tests respectively. My non-Retina MacBook Air on the other hand managed to average 1.2GBps and 430MBps in the same tests.
I used the new MacBook Air (2020) as my primary work laptop for this review, and the performance was pretty solid throughout. MacOS booted up quickly, multitasking was relatively effortless, and the larger trackpad made gestures even easier to use. Editing images in Adobe Photoshop CC 2020 was also handled very well. There's virtually no audible fan noise on the Core i3 model. The only time I heard it spinning was during a system update. I noticed that the bottom of the laptop was generally on the warmer side, whether I was watching a video or simply browsing the Web.
macbook air 2020 review top angle Mac
The Intel Core i3 version of the MacBook Air (2020) is powerful enough for casual workloads

The Magic Keyboard is excellent and feels much like the one on the non-Retina MacBook Air, only quieter. Text and icons in general look sharp on the Retina display, with no apparent jagged edges when viewing it from a normal distance. Videos also greatly benefited from the new display. Streamed movies and TV shows looked clear, colours were better saturated, and black levels were greatly improved compared to the non-Retina model. The stereo speakers got loud and the sound remained clear, but still lacked punch in the bass.
The MacBook Air (2020) is not meant for gaming but it can handle some titles from the App Store. The Core i3 variant that I tested had trouble churning out consistent framerates even in games such as Asphalt 9: Legends. I noticed mild intermittent stutter even in seemingly simple games such as Limbo, which is available through Steam. Heavier titles such as Shadow of the Tomb Raider refused to run altogether. The bottom of the laptop and the area above the keyboard got hot after about 10 minutes of gaming, but the keys and palm rest area weren't affected as much.
I did come across some peculiar behaviour with my MacBook Air (2020). When using it for a better part of the week, it randomly rebooted twice when it was left idle. I'm not sure what caused this, and I wasn't able to replicate it but I did find a few complaints on Apple's community page referring to a similar issue. Another little quirk I stumbled upon was that when cycling through the previews of large image files (around 8MB each), the OS would randomly freeze and the laptop would shut down. My older 2017 MacBook Air running the same version of macOS didn't have this issue. I'm not sure if this is a bug in macOS or if it's just my unit behaving erratically.
Apple claims the MacBook Air (2020) can run for up to 11 hours of Web browsing or up to 12 hours of video playback on a single charge. While I wasn't able to achieve these numbers during my review, I did get a satisfactory amount of runtime with regular workloads. A typical workday of mine usually involved writing in Pages, lots of Safari usage, some Photoshop work, and Spotify streaming in the background. With this, I was averaging about eight to nine hours on one charge. If I threw in a bit of gaming or watched a lot of videos, this dipped a little. The laptop ships with a 30W USB Type-C charger which takes about an hour and half to fully charge it.
macbook air 2020 review compare 2017 MacBook
The new MacBook Air (2020) is a big improvement over the older model from 2017 (right)

Verdict: Should you buy the MacBook Air (2020)?

If you're an existing user of a non-Retina MacBook Air from 2017 or earlier and were holding out for an upgrade, I feel the 2020 refresh is worth going for. The more compact body, better display, more efficient processor, and higher SSD capacity are all big upgrades. Plus, the new keyboard finally fixes the many complaints users have had with Apple's previous keyboard. The pricing might not be as aggressive as what the non-Retina models were selling for a couple of years ago in India, but it's still a lower price compared to the 2018 MacBook Air, which is a step in the right direction.
I would be remiss if I didn't mention that at Rs. 92,990 for the base model of the MacBook Air (2020), you will find more powerful Windows thin-and-light laptops with Intel 10th Gen CPUs. Acer's Swift 5 is one such model that comes to mind. However, the combination of macOS and the tight integration of iCloud on Apple devices is what makes the Mac experience unique, even though the hardware might not always be at par with its Windows rivals.
As far as productivity goes, I think the MacBook Air (2020) will be a solid choice for many people.

Top AI Trends of the Week